How to Automatically Forward Emails in Outlook 365? Steps Explained

Why Auto Forward Emails?
Forwarding Emails in Outlook 365 is a very simple process. No matter what your email client is, you just need to click a dedicated button, add the name of the receiver and send the mail.
Auto forwarding, on the other hand, happens automatically without any user interaction when it meets with certain conditions. There are various reasons why users can set up auto forward emails. Here are some of the possible uses.
- Redirecting emails being sent to former employees.
- Auto forwarding can act as backup, archive, or eDiscovery.
- Sending customers emails to a shared customer service mailbox.
- forwarding mails for out of office employees.
- Catch-all mailboxes.
- The user can use the mail forwarding option to Office 365 to forward emails automatically to a particular team leader or the admin of the organization.
- Users can forward their emails from OWA to any other email account, which can be used to keep track of all the emails and can be used as a backup in case of adverse situations or inaccessibility to the Office 365 account.
Steps to Enable/ Set Microsoft Email Forwarding in Office 365
The email forwarding feature facilitates automatically forwarding emails from Office 365 to another recipient. The recipient will be able to see the actual sender of the message, and who has sent the original message.
The following steps demonstrate how to set up email forwarding in Office 365:
- Log in to the Outlook Web app.
- Select the Mail option from the app launcher.
- Select Settings → Options and choose one of the following options:
– Accounts → Connected Accounts
– Mail → Accounts → Forwarding
- Depending upon the options, configure mail forwarding in the manner to learn how to automatically forward emails in Outlook 365:
-Under the Forwarding option, enter the email address to whom the emails need to be forwarded automatically. Check or uncheck Keep Copy of Messages, according to the requirement.
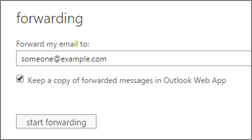
-Under the Start Forwarding option, enter the email address of the recipient for configuring email forwarding. Check or uncheck the Keep Copy of Messages, depending on the requirement.
How to Automatically Forward Emails in Outlook 365? Things You Should Know
- The Connected Account option should be used when the user needs to deliver emails from his other account directly into Outlook Web App. However, the Forwarding option should be used, when a user wants to forward the emails from Outlook Web App to some other email account.
- If the user has chosen an option to keep copies of forwarded emails, then care must be taken that forwarded emails copy do not exceed the mailbox limit. If the limit exceeds, then Office 365 would not be able to forward any new message.
How to Remove/ Disable Email Forwarding in Office 365?
The user might feel the necessity to stop the email forwarding automatically in Outlook 365. In that case, we can disable/ turn off email forwarding.
Follow the below steps to disable email forwarding in Office 365:
- Log in to the Outlook Web app.
- Select the Mail option from the app launcher.
- Under the settings option, choose any of the following:
-Options → Accounts → Forwarding
-Mail → Accounts → Forwarding - Click on the Stop Forwarding button.
The configured recipient will no longer be able to receive the automatically forwarded emails from your mailbox.
What is the Difference Between Redirecting and Forwarding Emails?
Microsoft differentiated between email redirection and email forwarding. When forwarding an email, the person who receives the forwarded messages are able to see who the original ender of the mail is. when you reply to an email, Outlook automatically selects the account that had forwarded the email as the receiver and not the original sender of the mail.
However, with redirections, the receiver of the email cannot see that the email is redirected, which gives the impression that it is received from the person who originally sent it. When you reply to an email that is redirected, your response is directly sent to the sender of the mail and not the user that redirected it to your inbox.
How to Automatically Forward Emails in Outlook 365 by Changing Forwarding Settings?
The users can change the email forwarding settings in Office 365 according to their requirements. The user may bring the following changes in the mail forwarding process:
- Change the email address of the recipient
- Change the settings for keeping email copy
You must carry out the following settings to change the forwarding settings for Office 365 Forward Emails:
- Sign in to Office 365 web app.
- Select Mail options from the app launcher.
- Select Settings → Options from the top of the page.
- Choose one of the following options:
–Account → Forwarding
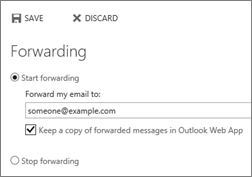
–Mail → Accounts → Forwarding - Under the prompt box, the user can change the email settings in the following ways:
-To change the email address of the recipient, edit the email address in the Forwarding my email option.
-To change the option for keeping email copy, choose the check box accordingly. - Click on Save to make the changes.
How to Automatically Forward Emails in Outlook for Mac?
Here are the steps you need to follow to forward emails in Outlook for mac:
- First, select the Home tab and then click on the Edit Rules option.
- Now you need to configure your inbox rules. First, create a rule for how forwarding of emails will work. For example, you can specify a sender. You can create multiple rules for email forwarding.
- Select the Forward to option under the Do the following tab, and enter the email address that the mails should be forward to. You can select multiple choices in this field. For example, you can select a special folder where you can store emails in addition to forwarding emails.
- Click on Ok to finish setting up.
- Configuring rules for emails in MacOS has fewer steps, and you can double click on a rule to make changes to it. A check mark indicates that the rules you set up are activated. All the incoming mails will be forwarded to the contacts that you have set up.
Conclusion
The motive of this blog is to make users understand the very useful feature of Office 365 i.e. mail forwarding feature to forward emails automatically to a particular email account and introduce the user to some methods on how to automatically forward emails in Outlook. We learned how to configure the email forwarding settings(how to automatically forward emails from Office 365), how to change the settings & also how to stop/ remove email forwarding.