How to Import PST to Outlook 365 Web? Complete Guide

Bringing PST files into Outlook 365 web might appear difficult at first, but with the correct strategy, it becomes easy. This technical guide will make the process clear for you, from getting the files ready to the actual import. We’ll look at resources and tips to make sure the process goes smoothly, concentrating on techniques such as the Network Upload and Import/Export Wizard. Follow the instructions, and you’ll effectively handle importing PST files into Outlook 365 Web. So, let’s get started and simplify this process!
Importing PST files to Outlook 365 web can seem like a daunting task, but it doesn’t have to be. With the right tools and a little bit of knowledge, you can easily import your PST files and start using them in Outlook 365 web.
In this guide, we will walk you through the process of importing PST files to Outlook 365 web, from preparing your files to importing them. We will also cover some tips and best practices to make the process as smooth and efficient as possible.
By the end of this guide, you will have a solid understanding of how to import PST files to Outlook 365 web using the Export & Import Wizard and, Network Upload method. So, without further ado, let’s get started
Network Upload Method to Import PST to Outlook 365 Web
When it comes to importing PST to Outlook 365 online, there are three different ways available for the users. One way is to use the Azcopy tool to import PST to Outlook 365 Web, but this method has its limitations. Let’s discuss each step in detail:
Step 1. Copy the SAS URL, then Download the AzCopy Tool
- Open your browser and navigate to https://compliance.microsoft.com. Use your admin credentials to sign in to the portal.
- Navigate to the left pane of the screen, click on Data Lifecycle Management, and select Microsoft 365 from the dropdown. Then a new screen will open, here you need to click on Import.
Note: If the Import option is missing, then you need to assign the required permissions in the Exchange Online role group.
- From the Import tab, click on the Add button to add a New import job.
- Now, an Import Data wizard will open with multiple tabs such as Name your Job, Select Import Job Type, Import Data, Select Mapping File, and Review.
- Provide all the required details in these tabs and select the Upload your Data option Do you want to upload or ship data? screen and then click on the Next button.
- It will create a Network Upload Import Job. Now, follow the below-mentioned steps on the Import Data page:
- Firstly, click on the Show network upload SAS URL option. Copy the SAS URL displayed on the page. Save it carefully, it will be used later to import PST files to Outlook 365.
- Then click on the Download Azure AzCopy button to download the AzCopy tool on your computer. It is an executable file; there is no need to install it on your system.
Step 2. Upload Respective PST Files to Outlook 365
Once you have downloaded the AzCopy tool on your computer, it is ready to use. It uploads the PST files and stores them in a Microsoft-provided Azure Storage location in the Microsoft cloud.
Note: Be careful and ensure that each PST file that needs to be imported to Outlook 365 Web App should not be larger than 20 GB. As it can impact the PST import process and you can get errors or face failure while executing the same. Additionally, the names of each PST file should be unique.
- Run CMD on your local computer.
- Navigate to the directory where the azcopy.exe file has been downloaded.
- Run the below-mentioned command to import the PST files to Microsoft Outlook 365.
PowerShell Command :- azcopy.exe copy “<Source location of PST files>” “<SAS URL>”
For example –
azcopy.exe copy "E:\PST\abc" "https://dbc91ac2cdda49d127553da.blob.core.windows.net/ingestiondata?sv=2015-04-05&sr=c&si=IngestionSasForAzCopy201203925129282846&sig=uT%2BHy1%2FHUFL6L3aw4476QxfZqMbeQdOGetYKguQwF44%3D&se=2020-11-20T05%3A18%3A22Z"
Step 3. Verify Imported PST Files to Microsoft Azure Storage. (Optional)
This is an optional step; here you can download the Microsoft Azure Storage Explorer (It is a free & open-source tool) to view and verify the respective PST files that you have imported to Azure blob.
Although this is an optional step, it becomes helpful when you create the mapping files for PSTs in the very next step. As there, you have to specify both the folder pathname and filename for each PST file you want to import to Outlook 365 Web App. Performing this optional step reduces the potential errors in PST mapping file creation.
- Download, install, and run the Microsoft Azure Storage Explorer tool on your local computer.
- Navigate to the Select Resource page from the Connect to Azure Storage dialog and then select Blob Container.
- Now, from the Select Authentication Method screen, opt for the Shared Access Signature (SAS) option, then click on the Next button.
- Here, paste the copied SAS URL on the Enter Connection Info screen and click on the Next button. When you paste the SAS URL, it will automatically auto-populate the Display Name with ingestiondata, then click on Connect.
- It will open the Ingestiondata Container, where you can find all the PST files that you have uploaded in Step 2. It is located under Storage Accounts > (Attached Containers) > Blob Containers.
Step 4. Now, Create a CSV Mapping File to Import PST Files
Once you have imported all the required local PST files to the Azure Storage location in your organization, you have to create a CSV file specifying the destination user mailboxes, PST file path, name, etc., to import them safely to Outlook 365.
- You need to download a copy of the PST Import mapping CSV file on your computer.
- Now open it using either Notepad or Microsoft Excel to edit and provide the required details as shown in the example below.
The Arrangement Order of Required Info:-
Workload,FilePath,Name,Mailbox,IsArchive,TargetRootFolder,ContentCodePage,SPFileContainer,SPManifestContainer,SPSiteUrl
Examples:-
- Exchange,,abc.pst,abc@xyz.onmicrosoft.com,FALSE,/,,,,
- Exchange,,efg.pst,efg@xyz.onmicrosoft.com,TRUE,,,,,
- Exchange,,jkl.pst,jkl@xyz.onmicrosoft.com,FALSE,/,,,,
- Exchange,,mnp_archive.pst,mnp@xyz.onmicrosoft.com,TRUE,,,,,
Note: While creating the CSV mapping file, you should keep in mind the limitation, i.e., you can only have a maximum of 500 rows in the CSV mapping file. If you need to add more rows, then you must need to create multiple CSV mapping files and multiple import jobs in the coming Step 5.
Step 5. Create a PST Import Job Accordingly
- Navigate to https://compliance.microsoft.com and use the same admin credentials to sign in as used in Step 1.
- Navigate to the left pane of the screen, click on Data Lifecycle Management, and select Microsoft 365 from the dropdown. Then a new screen will open, here you need to click on Import.
- From the Import tab, click on the Add button to add a New import job.
- Now, an Import Data wizard will open with multiple tabs such as Name your Job, Select Import Job Type, Import Data, Select Mapping File, and Review.
- Provide all the required details in these tabs and select the Upload your Data option Do you want to upload or ship data? screen and then click on the Next button.
- Now, check both options given here – I’m done uploading my files, and I have access to the mapping file, then click on the Next Button.
- Select the mapping file screen, and click on it to submit the previously created CSV file in Step 4.
- Once the file is attached, click on the validate button to validate the submitted CSV file just to ensure there is no error in the arrangement of data.
- Once the validation is completed successfully then you can see the file name in green color. After that, check the terms and conditions document and click on the submit button to save the job. Here, the job is successfully created.
- You will see a status flyout page, where you can analyze the progress and see the new import job in the list of Import PST files pages.
- You can also click on the Refresh button to see the latest status info displayed in the Status column. Once the status gets changed to Analysis Complete, then you are ready to import your PST files to Outlook 365.
Step 6. Apply Filters for Selective Import and start the PST Import Job
Once you create the PST import job in Step 5, Microsoft 365 examines the data in the PST files (safely and securely) by determining the age of the items and the different message types included in the PST files.
Once the analysis is completed, you have two options: whether you want to import the entire data into Outlook 365, or you can trim it down based on your preferences. To do so, you can set filters that help you control what PST data gets imported to Outlook 365.
- Now, from the Import tab in the Compliance Portal, click on the import jobs that you have created in Step 5. Click on Import to Microsoft 365.
- You can do the following:
- If you want to trim the data that you want to import, click Yes, I want to filter it before importing.
- To trim the data, you can configure different filters based on age, type, and users.
Or
-
- If you want to import the entire data, then click on the No, I want to import everything button, and then click on the Next button.
- You will see the status of the Import Job, where you can analyze the progress and see the new import job in the list of Import PST files pages.
- You can also click on the Refresh button to see the latest status info displayed in the Status column.
Importing PST File Into Outlook Web App, Manually Using Import/Export
If you choose to implement the manual method for importing PST to Outlook 365 web, you need to have a desktop MS Outlook on your system. Then you have to configure the Office 365 account in it.
Now we will see
How to Configure an Office 365 Account With Outlook 2016
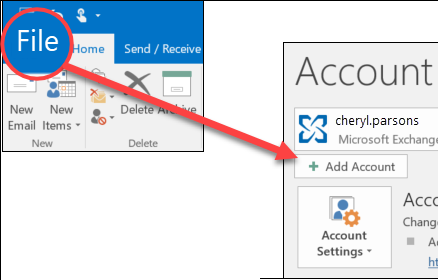
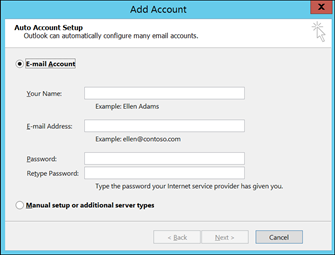
Step 1. Launch MS Outlook 2016 on the system and click on File>> Add Account.
Step 2. Enter our Office 365 email address and click Continue.
Step 3. Add the password when prompted and click on OK>> Finish.
Step 4. Office 365 will be configured in your Outlook. Now, you can migrate the PST file in Outlook, and it will get imported into Outlook 365 online as well.
Now it is time to transfer your PST file to Outlook:–
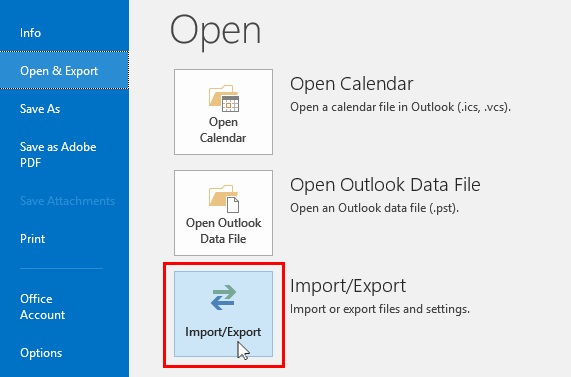
Step 1. Click on the File tab in Outlook 2016 and choose Open & Export>> Import/Export.
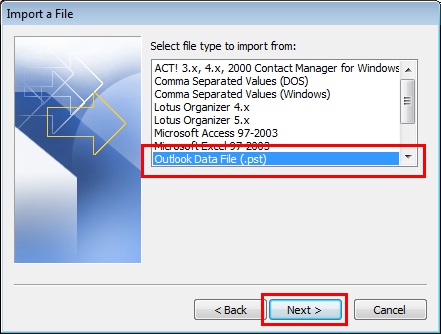
Step 2. From the Import Export Wizard, select Import from another program or file>> Outlook Data File (.pst) on two consecutive pages.
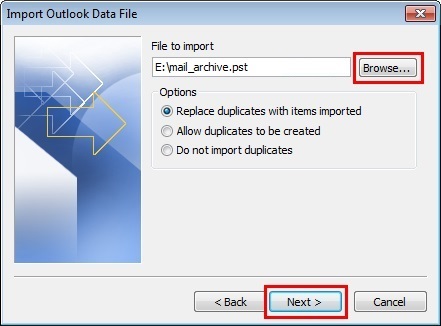
Step 3. Click on the Browse button to select the PST file from its location. Choose the preferred option and click Next.
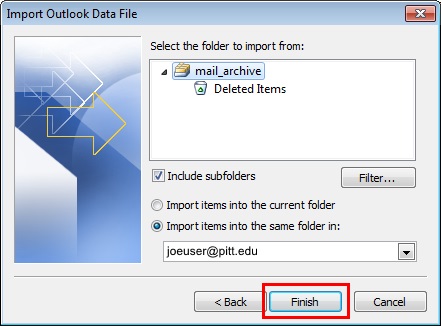
Step 4. If you want to import the complete file, select the root file and check the Include subfolders option. Now choose Import items into the same folder in the option, and then add your Office 365 account ID here.
Step 5. Click Finish to get done with the data transfer. Check Outlook Office 365, and you will see the items in the PST file have been migrated to that mailbox.
Limitations of the Manual Method
As you can see, this method includes the configuration of Office 365 in desktop-based Outlook. This makes importing PST to Outlook Web quite lengthy and complex. Moreover, people without MS Outlook on the system may not be willing to install it just for the sake of this process. For all these reasons, people choose the mentioned software for the easier and simpler import process.
There are several limitations to using the Network Upload method.
Some of these include:
- Time-consuming – The manual method can take a significant amount of time, especially if you have a large number of PST files to import.
- Error-prone – The manual method is prone to errors, such as accidentally importing the wrong PST files or importing files to the wrong location.
- Limited scalability – The manual method is not suitable for large-scale migrations, as it can be very difficult to manage and organize the large number of PST files that need to be imported.
- Lack of automation – The manual method does not offer any automation, which can make the process more tedious and time-consuming.
- Limited features – The manual method does not offer any advanced features such as filtering, deduplication, and mapping of folders.
Overall, the manual method is only suitable for small-scale migrations and not recommended for large-scale migrations.
User Concern
“Hello! I have more than 5 PST files that I need to import into the Outlook web app. I have checked the manual method, but that requires importing one PST file at a time. Is there any technique with which I can easily import all the PST files in one go? If anyone knows, please inform me here.”
—Andrew Will
If you need to import more than 5 PST files, then it is not possible with the manual solutions. For this, it is recommended to opt for the automated software available in the market.
Import PST Files to Outlook 365 Web App Using Software
If you are overwhelmed with these technical methods, then worry not. Now I am going to describe to you the most streamlined way using which you can easily import the PST files. I am suggesting the SysTools Office 365 Import Tool. With the help of this utility, you can easily bypass or eliminate all the above limitations of the manual method and import multiple PST files in Outlook 365 Web App.
Key Features Of Software:
- Import PST to multiple accounts via admin impersonation.
- Offers a date filter option to import required data as per the sent date.
- Comes with a category filter to import only the required data type.
- Does not require end end-user credential to import PST to Outlook Web.
- Offers three types of re-run import options to ensure complete data import.
- Generates two types of reports: summary and detailed.
- Provides a built-in dashboard to track the real-time import process.
5 Simple Steps to Import PST Files
- Step 1. Download, install, and run the software on PC.
- Step 2. Choose Outlook and Microsoft 365 as the source and destination.
- Step 3. Enable the required workload to import from PST to Outlook 365 Web.
- Step 4. Log in with the destination Microsoft admin credentials and validate.
- Step 5. Add user accounts and click on the import button.
Also Read: How to Import PST to Shared Mailbox Office 365 using PowerShell?
Final Words
Many Office 365 webmail users face the same problem when they have to import PST to Outlook 365 web. Since the manual method requires Outlook configuration, most users will find this technique lengthy and complex. For them, we have described a simple method that will allow users to directly import PST files to the Outlook 365 Web App. Users can pick any of these approaches as per their preferences.
Frequently Asked Questions
Q. How can I import a PST file into Outlook 365?
There are generally two ways that you can use to import PST files to Outlook 365: Network upload and Import / Export Wizard. However, both have their own set of limitations. Hence, using the above tool can help you complete the task without any limitations or data loss.
Q. Where is the PST File located in Outlook 365?
To see the storage location of Outlook PST files, you can follow the steps below:
- Step 1. From the main interface of Outlook for desktop, click on the File.
- Step 2. Navigate to Account Settings and click on Data Files.
- Step 3. Here you can see the destination path for saved Outlook PST files under the Location.
Q. How long does it take to Import PST to Outlook 365 webmail?
No matter whether you use Network Upload or Drive Shipping, manually importing PST files to Outlook 365 can be a time-consuming process. Moreover, you can face various limitations and errors while executing the same. Hence, using an automated solution is always a reliable option to go for.
Q. Is there any limitation to using the Network upload method?
Yes, there are various shortcomings associated with Network Upload.
- You should be technically sound, and you must have access to the Exchange admin center.
- You must have permission to create Import jobs, etc.
- In addition to this, while creating the CSV mapping file, you can only have a maximum of 500 rows in the CSV mapping file.
- If you need to add more rows, then you must need to create multiple CSV mapping files and multiple import jobs.