How to Import PST to Shared Mailbox Office 365? Step By Step Solution

PST files may cause a headache for users outside the Exchange Server environment. From the eDiscovery point of view, PST files are not considered a secure option for data security. When it comes to data migration, it is common to find that users have accumulated a large amount of data in gigabytes or possibly, terabytes.
Hence, it is required to transport the emails from the mail server and store them in the PST file format. For these problems, Microsoft offers a tool named PST Capture Tool. Microsoft allows users to import PST to shared mailbox Office 365 with the help of Import Service.
But, there are some prerequisites before the transfer process starts:
- An admin account on the O365 tenant
- Import Export Mailbox role assigned to the admins
- High upload bandwidth will be considered a bonus
Also Read: How to Import PST to Outlook 365 Web? in a Few Steps?
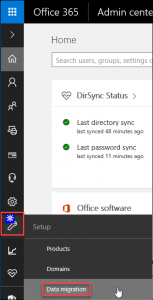
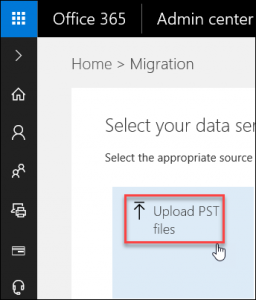
How to Import PST to Shared Mailbox Office 365 Manually?
This feature is built on the Azure storage established by Microsoft. It is used to store the PST file before importing them into the mailboxes.
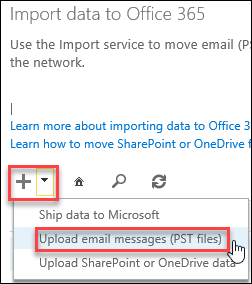
For the PST file to be imported first, a storage account will be generated. It will take a few minutes and there are chances that a user wishes to give it two attempts before it is created. For that, it is required to click on the option “Show network upload SAS URL.” This URL will comprise the following things:
- Storage Account Name
- Container Name
- Shared Access Signature
https://dd092cec1d084ab8b190526.blob.core.windows.net/ingestiondata?sv=2012-02-12&se=2017-02-05T13%3A33%3A07Z&sr=c&si=IngestionSasForAzCopy201611212055520769&sig=aeBqKqsM
ilU8PDHueVj3Q4c5hkgE%3D
- Storage Account Name: dd092cec1d084ab8b190526
- Container Name: ingestiondata
- Shared Access Signature: ?sv=2012-02-12&se=2017-02-05T13%3A33%3A07Z&sr=c&si=IngestionSasForAzCopy201611212055520769&sig=aeBqKqsMilU8PDHueVj3Q4c5hkgE%3D
The shared access signature consists of the following parts:
- sv: storage service version
- se: expiration date
- sr: storage type (Container/Blob)
- si: Storage identifier
- sig: Signature
This URL will be used by the AzCopy / Azure Storage Explorer tool to import the Outlook PST file.
Note: The URL may change with time, but, the shared access signature part is certainly valid for 60 days.
Related: How to Forward Emails in Outlook 365? Different Ways Explained
Import PST to Shared Mailbox Office 365 PowerShell – Upload PST
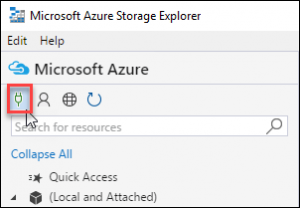
Once a user has done the storage provision, the upload procedure can be started. To upload PST to shared mailbox Office 365 PowerShell is an alternative tool. Suppose, AzCopy can be used. It is the command-line tool to import PST to shared mailbox Office 365 account. Azure Storage Explorer, is a graphical tool. They both are good at one’s place and any of them can be used.
#Azure
“Failed to validate destination: One or more errors occurred. The remote server returned an error: (404) Not Found. The specified resource does not exist.”
#AZURE STORAGE EXPLORER
And now, the software can also be used to upload the PST file.
Upload PST to Shared Mailbox Office 365 – Mapping File
Once the PST file is uploaded to the Azure storage, it is needed to build a CSV file that will map Outlook PST files to the destination folder and mailboxes. For instance,

It is needed to maintain the structure of the PST file. The case is kind of delicate for the “TRUE” or “FALSE”, and for the name of the Outlook PST file.
Import PST File to Shared Office 365 PowerShell
It is the final step, it is needed to import the PST mapping file and execute the import option, so import PST to shared mailbox Office 365 Powershell would going to complete.
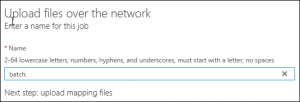
Click on “Finish” and the process is complete. The import process will continue on the Microsoft side. A user can also examine the progress with the help of details of the batch job.
Limitation of Manual Solution
Although this is a free method that can help users to import PST to shared mailboxes, the method is quite tricky for some organizations. Additionally, this method is only available in certain parts of the world. In case, you get a message, “import service for your region has not rolled out yet!” then it means you cannot use the Import service for now. In such cases, the user can go for the alternative solution below.
Also Read: How to Move Google Drive Folder to Another Drive – Effortless Solution
Bringing It All Together
Microsoft Office 365 drive shipping option is considered helpful when the organizations have the PST file in terabytes. The size of the mailbox allotted to the user is 50GB and there is unlimited file archived in Office 365, it is not possible to store all the data on the server. That is when the need to import PST to shared mailbox Office 365 PowerShell emerges.
However, drive shipping is always considered an expensive and time-consuming process. Moreover, the PowerShell method is way more technical for naive users. Hence, it is always a great idea to opt for the most secure automated tool, as mentioned above, to import PST to shared mailbox in Office 365.
Frequently Asked Questions
Q. What steps can I take to guarantee the accuracy of data when importing a PST file?
To ensure the accuracy of data, use resources such as Azure Storage that support secure upload techniques, like SAS URLs, and check the data mappings in CSV files before importing. Also, keep an eye on the import procedure for any mistakes or inconsistencies.
Q. What storage needs are there for importing PST files into Office 365?
You require enough space on Azure to hold PST files while they are being imported. Make sure your Azure account has enough room and think about the costs of moving data, particularly for big amounts of information.
Q. What should I do if I encounter errors during the PST file import process?
If errors occur, check error logs for specific details, verify permissions and configurations (such as Azure storage settings and Office 365 roles), and consider consulting Microsoft support or community forums for troubleshooting assistance.