Learn 3 Methods for Rackspace to Office 365 Migration

Published: June 5th, 2024 • 10 Min Read
Rackspace once touted as the trendsetter in email management has lost its significance over time. So it’s all but natural that users will look to migrate from Rackspace to Office 365 environment.
You may be aware that Office 365 is now renamed to Microsoft 365 and is no doubt a better platform in all comparison metrics. However, this migration is not easy especially when we look at the manual processes but readers of this article need not worry about that.
This is because we have an all-encompassing modern software with which you can say goodbye to all your migration woes. Let’s begin by learning a few things about Rackspace and understand why leaving it is a good idea.
Reasons Behind Rackspace to Office 365 Migration
Over the years multiple issues crept up in Rackpace hosted Exchange servers and Rackpace email services. Moreover, the lack of a clear explanation and the long time for a proper resolution angered many of its customers.
Apart from this Rackspace has rarely added any new features or tools that make it viable in the era of AI and hybrid working environments.
In stark contrast, Office 365 now has a feature called Copilot which helps users automate small and repetitive tasks. Not to mention the diverse collection of industry-leading products such as MS Teams, One drive, etc.
So it’s not a surprise that we regularly encounter many such user queries :
I have been using Rackspace Mails for the last few years. Last month one of my friends suggested moving away from Rackspace for the better. So I wanted to ask if is there any manual or automated tool for this purpose and how to migrate from Rackspace to Office 365
—John Will
Additionally, with its parent company focusing away from email-based services it’s doubtful that Rackspace will ever return to its formal glory.
With this one thing becomes clear all users who still operate a mailing service with Rackspace must move to an alternative. Shockingly, even Rackspace has a method to do this data transfer manually let’s see how it’s done.
Method 1: Migrate Rackspace to Office 365 Using Cutover Migration
This first method works well for users who have a small number of mailboxes (Less than 150) and use a Rackspace with Exchange 2010 or newer. However, for this one needs to have a basic knowledge of Rackspace and Office 365 Admin Portals.
Follow the given steps to easily export Rackspace to Microsoft Office 365 account:
Create a Rackspace Admin Account
Create a new email account. Give Full Access permission to this user as all of your mailboxes.
- On the Mailboxes of the new account Grant Full Access Permission
Open each email account in the Rackspace tenant. Now, go to the Permissions tab and grant the permissions of Full Access to the new account created for migration in the previous step. This will help you by opening 10 tabs at a time to grant these permissions. Do the same for all the mailboxes and all the resources.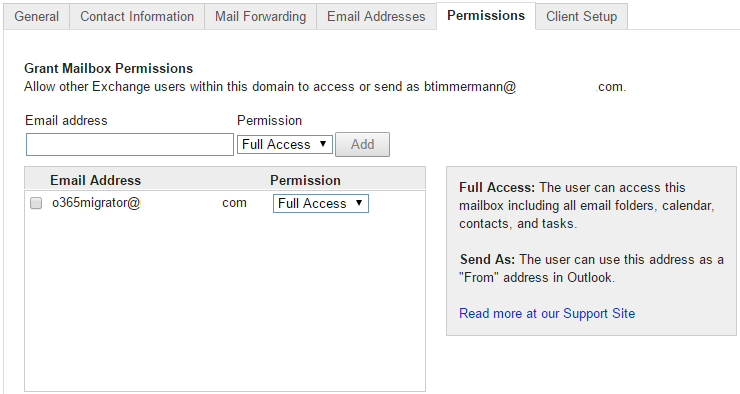
- Fill in the Manager’s attributes in all the Distribution Groups
Because of the GUI of Rackspace web, you can’t fill in this attribute. To do so, you have to export the Distribution Lists in the CSV format, fill in the Managers column, and then reimport the distribution lists. - Make sure that all the objects are visible in the Global Address List
These objects include the Distribution Lists, Contacts, Resources, and Mailboxes to be migrated from Rackspace to Office 365.

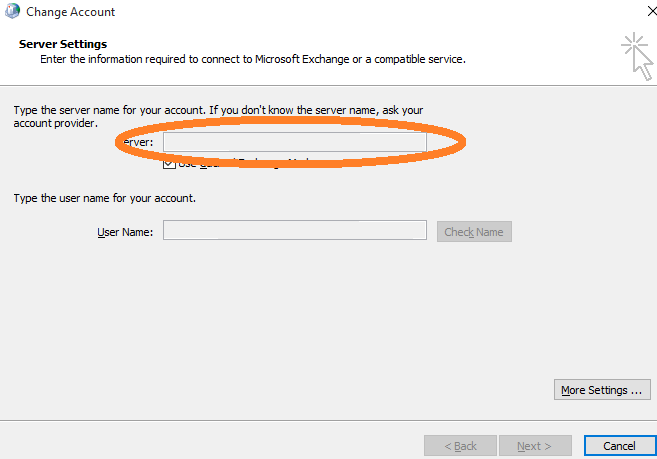
Find the Rackspace Exchange Server
- Find the server on which your emails are hosted.
To find this:
Go to the Control Panel >> Open Mail >> Email Accounts. Now, find your Rackspace account from the given list >> click Change. The server Rackspace hosting your account will be in the box.
- Sign up for the Microsoft Office 365 E3 Trial
If you want to complete the process of Rackspace to Office 365 migration without paying or hold on until the users are ready to log in. You can sign up for a Microsoft 365 E3 trial version with which you’ll get 4 weeks of free access to MS Office 365 to test the environment. - Create Domains in Office 365
Before migrating the mailboxes, it is required to create your domains in Microsoft Office 365. For this, click “Domains” in the Office 365 Admin Center. Now, add all your email domains.
- Create a Migration Endpoint
Create a Migration Endpoint in the Powershell instead of Web GUI. Using Web GUI will create a Migration Endpoint that relies on the Autodiscover DNS record to discover your Exchange server. By creating the endpoint manually, you can continue to run the synchronizations between Rackspace & MS Office 365 even after you move the DNS records over to O 365.
Run the following Powershell commands: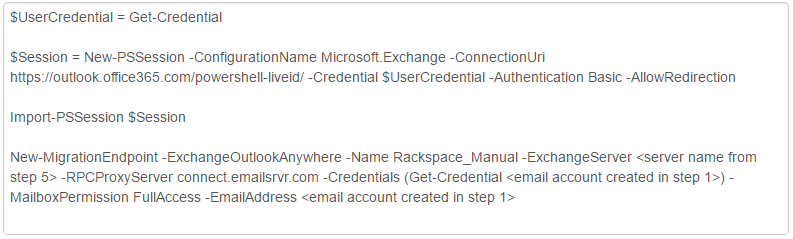
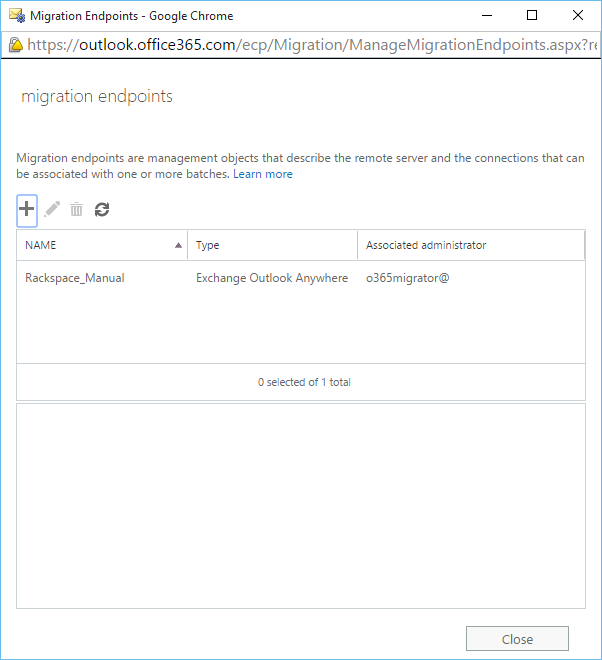
After completing the above steps successfully, you can easily see your new Migration Endpoint from:
Office 365 Admin Center >> Admin >> Exchange >> Exchange Admin Center >> Recipients >> Migration >> Migration Endpoints - Create Migration Batch
In the web interface, create a migration batch after creating the Migration Endpoint.
1. Go to the Exchange Admin Center >> Recipients >> Migration screen.
2. Now, select the + (add) and then Migrate to Exchange Online. - Finalize Batch Creation
1. Select the option of Cutover Migration >> Click on Next
2. Now, confirm Migration Endpoint >> Next
3. Name the Migration Batch >> Next
4. Start The Batch >> Now, Select the option of Automatically Start the Batch >> Click on New.
The migration batch will start running immediately. This could take some time between several hours to a few days, depending on the number of mailboxes you want to migrate. After the completion of the batch migration process, Review the details, check if there are any failures, and fix them. - Now, run another sync
The initial migration batch will take some time to run, so you will have to wait. You can also try to re-run the migration batch created in the above steps (but it won’t run if a mailbox already exists). It has been checked that deleting a migration batch (not the migration endpoint) and then re-creating it in Office 365 will do an incremental sync. Now, delete the original batch and then create a new batch.Note: You can Configure DirSync also, as it is an optional part.To synchronize Distribution Groups, Security Groups, Users, and Password Changes to the cloud, set up DirSync between the on-premise AD and Office 365.
- License your users
After synchronizing Rackspace and Office 365 data, it is required to license the users before they can access the services of Microsoft 365. - If you haven’t run the DirSync, which was an optional part, you have to Reset the user passwords in MS Office 365 and provide passwords to the users to access the Office 365 resources.
- Plan a time for DNS cutover
When the mailboxes are synced between Rackspace & Office 365, you can plan the cutover date and time. When you are ready to perform a DNS cutover, you can refer to the DNS settings required for all the domains by referencing Domains in the Microsoft Office 365 Admin Center. - Wait for DNS propagation
To check whether the DNS records have propagated worldwide click: https://www.whatsmydns.net/. If all the servers display the correct record, you can proceed further. - Do the final sync
Sync the complete user data of Rackspace and Office 365 one final time. - Now, Disable Users
After migrating all the users to the O 365 account, disable their user accounts in Rackspace. It will prevent you from accidentally sending emails. - Reconfigure Microsoft Outlook
Then, to wipe out the settings of Rackspace Exchange and to create a new Office 365 profile, it is suggested to run a script or you can configure an MS Outlook account at your convenience. - Request Forced MX Routing
To check if the emails from Rackspace customers are delivered to O365 mailboxes or to the Rackspace tenant, you will have to contact Rackspace Support to request Forced MX Routing. After doing this task, verify that the mailboxes are complete.
Re-enable DirSync
If you complete the DirSync (optional) setup, you can re-enable it after the final sync is completed. You can’t run any additional cutover syncs if DirSync is enabled.
Method 2: Self-Service Migration Tool
You can also go for Rackspace’s Self-Service Migration Method, which is a private-label version of MigrationWiz. Users may think this is similar to Proton Mail to Office 365 migration but this method is quite different. Look at the steps to use it and compare it yourself:
- Click on the button with the name Start Migration Now.
- Once an email notification arrives on your admin account log in to the Rackspace portal for further verification.
- Either choose the server address manually or type in the IP address for the host then, Click Next.
- After that type the configuration settings for both source and destination server one at a time. (For a hybrid environment you have to complete all the steps twice),
- Type all details like email ID, username, and password for all mailboxes within the spreadsheet, or add mailboxes one by one by hitting the + symbol, then press Next.
- Perform a demo migration to test out that all things are working as intended then start with the actual process to migrate emails from Rackspace to Office 365.
- Once the status gives the signal of Ready for migration, click Next. This will start the migration.
Source: Migrate your email by using the Self-Service Migration Tool
Limitations of Moving from Rackspace to Office 365 via Self-Service Tool
- Users require not only Admin Credentials but also Cloud Office Control Panel access and DNS host Administrator access.
- It is time time-consuming process that sucks away several hours with a high chance of failure in between.
- Strict limitation on mailbox size (source mailbox cannot be more than 70 % full at the time of migration).
- Moreover, all features may not be available at the time of migration. Users will have to visit a separate portal and unlock the full functionality of the self-service mechanism. Only then can they migrate Rackspace email to Microsoft 365.
- The method demands access to the email address and password for every mailbox that you want to shift which is a privacy concern for many.
- There is no option to pause the migration in between so if due to any reason (network disruption, power outage, etc.), your migration terminates. There is a chance of data loss and you also have to restart the entire operation again.
Conclusion
This article covered three different migrating methods from Rackspace to Office 365 environment. The manual method relies on luck as well as the expertise of the IT admin. Moreover, all those shortcomings can be nullified by using the professional utility. A third method involves the Rackspace self-service migration mechanism. Now it’s up to the user to choose the best alternative that is both quick and secure at the same time.
Frequently Asked Questions
Q. How much does it cost to switch from Rackspace to Office 365?
The expenses can differ based on the number of email accounts, how complicated the move is, and if you opt for a professional service or a tool. Certain tools provide free trials or a few free migrations.
Q. Do I need to inform my contacts about the migration?
It’s advisable to notify your contacts to prevent any problems with email delivery throughout the changeover period.
Q. What should I do if I encounter issues during the migration process?
Refer to the support documentation provided by the migration tool or service you are using, or contact their customer support for assistance.
Q. Will my email signatures and preferences be moved over during the migration?
Your email signatures and preferences might not be automatically moved and could require manual adjustment in Office 365.